How Often to Clean a Chicken Coop (Daily to Yearly)

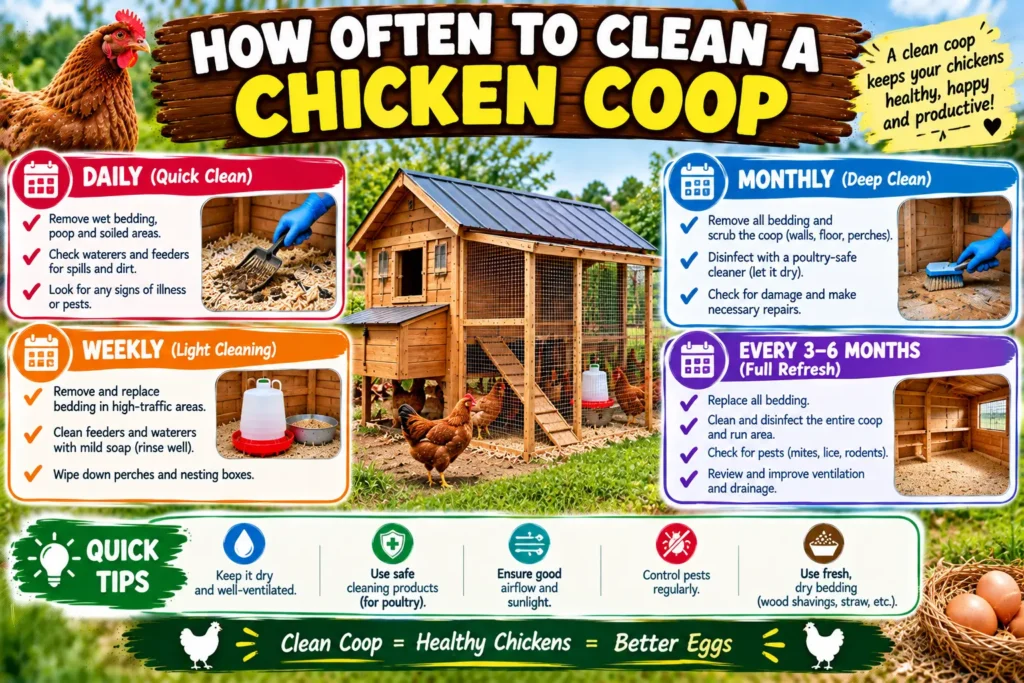
You walk out to the coop and the smell hits you first. Or it looks fine, and you wonder whether you’re cleaning too much or too little. Here is the short answer on how often to clean a chicken coop: spot-clean every day, refresh the bedding every one to two weeks, deep clean every three to six months, and fully disinfect once or twice a year.
Those timings shift with flock size, bedding type, and weather. This guide gives you a realistic schedule, step-by-step deep-cleaning instructions, warning signs to watch for, and the mistakes that trip up new keepers.
Table of Contents
⚡ Quick Answer
- Daily: remove wet spots and droppings, refresh water, check feed
- Every 1–2 weeks: change nest box bedding and replace or turn floor bedding
- Every 3–6 months: full deep clean (empty, scrub, dry, re-bed)
- 1–2 times a year, or after illness: disinfect the whole coop
- Clean sooner if: you smell ammonia, see damp bedding, or spot mites
How Often to Clean a Chicken Coop: The Short Answer
There is no single perfect number, because a coop with three hens and a coop with thirty are very different jobs. But most backyard flocks do well with a layered routine. Small daily jobs keep the big jobs small.
Use this table as your starting point, then adjust using the factors later in this guide.
| Task | How Often | Time Needed |
| Spot-clean droppings, wet bedding, and dropping board | Daily | 5–10 minutes |
| Refill and rinse waterers, check feeders for damp or mold | Daily | 5 minutes |
| Replace nest box bedding | Every 1–2 weeks (sooner if soiled) | 10 minutes |
| Rake, turn, or replace floor bedding | Every 1–4 weeks, depending on bedding | 15–30 minutes |
| Scrub feeders and waterers | Weekly | 10–15 minutes |
| Check roosts, walls, and corners for mites | Monthly | 10–20 minutes |
| Full deep clean (all bedding out, scrub, dry) | Every 3–6 months | 1–3 hours |
| Disinfect coop and equipment | 1–2 times a year, or after illness | 2–4 hours plus drying |
If you want a quick rule to remember: small jobs daily, medium jobs weekly, big jobs seasonally.
Why a Regular Chicken Coop Cleaning Schedule Matters
Chickens produce a lot of manure, and a large share of it lands on the roost overnight. Droppings mix with moisture from breath, spilled water, and rain. That mix breaks down into ammonia, and it also feeds bacteria, fungi, and parasites.
Here is what a poor cleaning routine can lead to:
- Respiratory irritation. Ammonia from wet litter irritates the eyes and airways of birds. The Merck Veterinary Manual and university extension services both link poor air quality to respiratory trouble in poultry. If you can smell ammonia, your hens are already breathing more than they should.
- Parasites and disease. Wet, dirty litter is a well-known risk factor for coccidiosis, and moldy bedding can lead to aspergillosis. Red mites hide in cracks and roost bars by day, then feed on hens at night.
- Dirty eggs. Soiled nest boxes mean stained shells and a higher chance of bacteria on the surface.
- Pests. Flies, rodents, and wild birds are drawn to old manure and spilled feed.
- Human health risk. The CDC notes that backyard poultry can carry Salmonella even when they look healthy. Clean habits protect you and your family too.
💡 Did You Know?
Red mites (Dermanyssus gallinae) spend most of their time off the bird, hiding in cracks near roosts. You can miss them entirely if you only look at the hens during the day.
Read More: https://lashegg.com/how-to-take-care-of-chickens/
The Chicken Coop Cleaning Schedule, Broken Down
Below is the routine in detail. Think of it as a menu: start with the basics and add tasks as your flock grows.
Daily Tasks (5–10 Minutes)
Daily care is the most important part of the schedule. It keeps the coop from ever reaching the “gross” stage.
- Scoop or rake droppings from under the roosts, or scrape the dropping board.
- Remove wet, caked, or clumped bedding, especially around waterers.
- Empty, rinse, and refill water. Chickens will avoid dirty water and drink less.
- Check feed for damp spots, mold, or clumps, and discard any that look off.
- Collect eggs and remove any broken ones right away.
- Look around for signs of pests, such as droppings from rodents or missing feathers on hens.
🔧 Expert Tip
A dropping board or tray under the roost bars is a big time saver. Cover it with sand or pine shavings and scrape it each morning. You remove much of the night’s manure in about two minutes.
Weekly Tasks (20–40 Minutes)
Once a week, go a step beyond spot-cleaning.
- Replace nest box bedding, or sooner if a hen has soiled it.
- Rake and turn the floor bedding so wet layers dry out.
- Scrub waterers and feeders with hot water and a brush. Slime inside a waterer is a sign of biofilm, and it should never be left to build up.
- Sweep out dust and cobwebs from corners, vents, and windowsills.
- Check the run for muddy patches or manure buildup.
Monthly Tasks (30–60 Minutes)
Monthly is your inspection round.
- Check roost bars, joints, and crevices for red mites. Try a white cloth or a flashlight after dark.
- Wash roost bars if they look grimy.
- Check that vents are open and clear of dust.
- Look for gaps, chewed edges, or droppings that might point to rodents.
- Top up bedding where it has become thin.
Every 3–6 Months: The Full Deep Clean
A deep clean means removing all the bedding and everything else inside, then scrubbing and drying the coop before adding fresh material. A small coop with wet weather might need one every three months. A dry, well-ventilated coop with few birds may stretch to six.
The step-by-step process is in the next section.
Once or Twice a Year: Disinfecting
Disinfecting is different from cleaning. Cleaning removes dirt. Disinfecting reduces germs on a surface that is already clean. Most flocks benefit from disinfecting in spring, fall, or both. You should also disinfect after a disease outbreak, after a heavy mite problem, or before bringing new birds into an empty coop.
What Changes How Often You Need to Clean
The answer to how often to clean a chicken coop depends on your setup. Here are the main factors.
| Factor | Cleans More Often If… | Cleans Less Often If… |
| Flock size | Many birds in a small coop | Few birds in a large coop |
| Space per bird | Tight, crowded housing | Plenty of room (many guides suggest about 4 sq ft per hen inside and 10 sq ft in the run) |
| Bedding type | Straw or thin layers | Sand or well-managed deep litter |
| Climate | Humid, rainy, or freezing | Hot, dry, and breezy |
| Ventilation | Poor airflow, damp air | Good high vents without drafts |
| Roost setup | No dropping board | Dropping board scraped daily |
| Waterer type | Open bowls that get kicked and spilled | Nipple or cup drinkers |
| Bird type | Ducks or geese (very wet droppings) | Chickens only |
Chicks and brooders are a special case. Brooder bedding gets wet fast, so many keepers change it daily or every other day for young chicks.
How Often to Clean a Chicken Coop by Bedding Type
Your bedding choice changes the routine more than almost anything else.
| Bedding | Spot-Clean | Full Change | Notes |
| Pine shavings | Daily | Every 1–4 weeks | Absorbent and easy. Avoid cedar, which can be irritating to birds. |
| Sand | Daily (like cat litter) | Every 3–6 months | Dries quickly and does not hold odor when kept dry. Wet sand should be replaced. |
| Straw | Daily | Every 1–2 weeks | Traps moisture and can mold, so watch it closely. |
| Hemp | Daily | Every 2–4 weeks | Highly absorbent, though it costs more. |
| Deep litter method | Weekly turning | Once or twice a year | Works only when litter stays dry and airy. |
The deep litter method works by letting bedding build up in layers, then turning it so beneficial microbes help break down manure. University extension guides describe it as workable when the coop is dry and well ventilated. If your litter turns wet or smells sharp, it isn’t working, and you need to switch to full changes.
Summer vs. Winter
Summer. Heat speeds up smells, fly breeding, and mite reproduction. You may need to scoop more often and check for mites every couple of weeks.
Winter. Cold air holds less moisture, so damp bedding can lead to frostbite on combs and toes. Keep ventilation open near the roof line (not at bird level) so moisture can escape without blowing on the hens. Many keepers rely on deep litter in winter, since a thick dry layer gives extra insulation.
Signs Your Coop Needs Cleaning Sooner
Your senses are a better schedule than a calendar. Trust them.
| Sign | What It Usually Means | What to Do |
| Sharp ammonia smell | Wet, packed manure | Remove wet bedding, add fresh, check ventilation |
| Damp or caked bedding | Leaky waterer, condensation, or too many birds | Fix the source, replace bedding |
| Lots of flies | Old manure or spilled feed | Scoop, clean spills, tidy the run |
| Dirty or stained eggs | Soiled nest boxes | Change nest bedding more often |
| Hens scratching or losing feathers | Possible mites or lice | Inspect roosts at night, deep clean, treat |
| Rodent droppings or chewed feed bags | Easy food access | Store feed in metal bins, seal gaps |
| Runny eyes, coughing, or sneezing | Poor air quality or illness | Improve air, and call a vet if signs persist |
⚠️ Warning
Never mix bleach with ammonia-based cleaners, and never use them together in a closed space. The fumes can be dangerous to you and your birds. Always follow the product label and ventilate the coop well.
How to Deep Clean a Chicken Coop, Step by Step
A deep clean sounds like a big job, but it goes quickly once you have a system. Here is a basic kit for cleaning chicken coop floors, walls, and roosts:
- Rubber or nitrile gloves
- N95-style dust mask and eye protection
- Flat shovel, scraper, and stiff broom
- Wheelbarrow or heavy bags
- Bucket, hard-bristle brush, and detergent
- Poultry-safe disinfectant (follow the label)
- Shop vacuum (helpful for dust and cobwebs)
- Fresh bedding
Steps:
- Pick a dry day. A sunny, breezy day helps everything dry fast. Move the hens to a safe run or temporary pen.
- Put on your gear. Old bedding creates dust that you should not breathe in.
- Remove everything movable. Take out feeders, waterers, nest pads, and any removable roost bars.
- Scrape and shovel. Remove all bedding and manure down to bare floor. Dry-scrape stuck-on droppings before adding water.
- Vacuum or sweep. Get dust and cobwebs from ceilings, corners, and vents while everything is dry.
- Scrub. Use hot water and detergent on floors, walls, roost bars, and nest boxes. Pay extra attention to cracks and the ends of roosts, where mites hide.
- Rinse. Remove soap residue with clean water.
- Disinfect (if it’s a disinfecting cycle). Apply a poultry-safe product according to the label, including the contact time.
- Dry completely. Open doors and vents. Damp wood invites mold, so do not rush this step.
- Add fresh bedding. A layer of about 2–3 inches works for most shavings. Deep litter starts thicker, at 4–6 inches.
- Return the hens and wash up. Wash your hands and tools, and keep coop shoes outside your house.
🔧 Expert Tip
Always clean before you disinfect. Dirt and organic matter reduce how well disinfectants work, so scrub first, rinse, and only then apply your product.
Can You Use Vinegar to Clean a Chicken Coop?
Vinegar can help remove light residue and mineral deposits from waterers, and many keepers like it because it is gentle. But it isn’t a reliable disinfectant for coop surfaces. Use it as a mild cleaner, and choose a poultry-safe disinfectant when you actually need to reduce germs.
Cleaning Nest Boxes, Roosts, Feeders, and Waterers
Each area has its own rhythm.
Nest boxes. Replace bedding every one to two weeks, or right away if an egg breaks or a hen soils it. Clean nests mean cleaner eggs and fewer washing chores.
Roost bars. Scrape droppings from the bars weekly and scrub them during each deep clean. Wood absorbs moisture, so let it dry fully.
Feeders. Empty and brush out feeders weekly. Feed that gets wet can grow mold quickly, and moldy feed can harm your flock.
Waterers. Rinse daily and scrub at least weekly. Slime, algae, or floating debris means it’s overdue. Nipple drinkers keep water cleaner and reduce spills, which keeps bedding drier.
The run. Rake out droppings, and refresh sand or wood chips when they turn muddy. A wet run can carry disease into the coop on hens’ feet.
Common Mistakes That Make Coops Dirtier
❌ Common Mistakes
- Cleaning only when it smells. By then, ammonia has been building for days.
- Adding fresh bedding on top of wet bedding. This buries the problem and creates mold.
- Skipping the drying time after a wash.
- Using strong disinfectants without cleaning first.
- Running deep litter in a damp, poorly ventilated coop.
- Sealing the coop tight in winter. Moisture needs a way out.
- Overcrowding. More birds mean more manure, so you clean more often.
- Ignoring the waterer. Leaks and spills are the biggest cause of wet litter.
Many keepers also guess how often to clean a chicken coop by looking at the floor alone. Check the roost area, corners, and nest boxes too, because they hold hidden buildup.
What to Do With Used Bedding and Manure
Chicken manure is rich in nitrogen and makes great garden fertilizer once it’s composted. But fresh manure is “hot” and can burn plants, and it may carry bacteria.
- Compost bedding and manure for several months before using it in the garden. Organic growers follow USDA National Organic Program waiting periods for raw manure, and many extension services publish similar guidance for home gardeners.
- Keep compost piles away from wells, streams, and vegetable beds that will be harvested soon.
- Wash your hands after handling manure or compost.
- Bag and dispose of bedding from sick birds separately, and do not compost it without advice from a vet.
Cleaning After Illness, Mites, or Predator Visits
Some situations call for cleaning beyond the normal routine.
After illness. Some pathogens survive in dust and litter for a long time. Marek’s disease virus, for example, can remain infectious in feather dander and litter for months. After an outbreak, remove all bedding, scrub, disinfect, and let the coop dry completely. Then talk to your vet about how long to wait before adding new birds.
After a mite problem. Deep clean, focusing on cracks, roost ends, and nest boxes. Use a poultry-safe treatment and repeat as the product label directs, since mites can return after the first round. Food-grade diatomaceous earth is popular, but research on how well it works is mixed, and you should avoid creating dust clouds that you or your birds could inhale.
After a rodent or predator visit. Remove contaminated feed, clean droppings, and repair the entry point.
Home Care vs. Veterinary Care
| Situation | Home Care Is Usually Fine | Call a Vet |
| Routine dirty coop | Yes: scoop, re-bed, scrub | Not needed |
| Mild mites or lice | Yes: clean and treat with a poultry-safe product | If hens are weak, pale, or losing weight |
| Mild ammonia smell | Yes: fix moisture and ventilation | If hens cough or breathe with effort |
| Blood in droppings | No | Yes, promptly |
| Sudden deaths or several sick birds | No | Yes, right away |
| Swollen face, discharge, or gasping | No | Yes, urgently |
| Sharp drop in eggs plus lethargy | Improve conditions | Yes, if it does not resolve quickly |
🩺 When to Call a Vet
Contact an avian or poultry vet if you see bloody droppings, breathing trouble, swelling around the face, twisted necks or other nerve signs, or several birds becoming sick or dying at once. If you suspect avian influenza, contact your state veterinarian or the USDA. Cleaning cannot replace a proper diagnosis, and only a vet can confirm what is making a bird ill.
Tips to Make Coop Cleaning Faster
- Use a dropping board. It is the single best time saver.
- Choose easy-to-clean surfaces. Sealed plywood or vinyl flooring wipes clean faster than bare wood.
- Raise the coop off the ground. It helps keep the floor dry and blocks some pests.
- Improve ventilation. Vents high above the birds let moist air escape.
- Fix leaks fast. One dripping waterer can ruin an entire bedding patch.
- Keep tools nearby. A hook with a scoop and rake by the door means you’ll actually do the daily job.
- Set reminders. A simple chicken coop cleaning schedule on your phone helps, especially during busy weeks.
Final Thoughts: Keep the Routine Simple
The best answer to how often to clean a chicken coop is a rhythm you can keep. Scoop daily, refresh weekly, deep clean every few months, and disinfect once or twice a year. Adjust for your flock size, bedding, and climate, and let smell, moisture, and bird behavior tell you when to clean sooner.
Keep an eye on your hens as you work. Watch their droppings, breathing, appetite, and egg production. If something looks wrong, or several birds seem unwell, call a poultry veterinarian rather than guessing.
5. FAQ
How often to clean a chicken coop if you only have a few hens?
Even with three or four hens, spot-clean daily and replace bedding every two to four weeks. A full deep clean every four to six months works for most small, dry coops. Clean sooner if the bedding gets wet or smells of ammonia.
Do you have to clean a chicken coop every day?
You do not need to scrub it every day, but a five-minute spot-clean helps a lot. Removing droppings and wet spots stops odor and disease risk from building up.
How often should you change chicken bedding?
It depends on the type. Pine shavings often need a full change every one to four weeks, straw every one to two weeks, sand every three to six months, and deep litter once or twice a year.
Is it OK to leave chicken poop in the coop?
Some poop is normal, and the deep litter method uses it on purpose. But wet or caked manure should be removed. Left too long, it produces ammonia and encourages parasites and mold.
Can chickens live in a dirty coop?
They can survive for a while, but they will not thrive. Dirty conditions increase stress, respiratory problems, parasites, and dirty eggs.
How do you keep a chicken coop from smelling?
Keep bedding dry, fix leaky waterers, remove droppings daily, add ventilation, and avoid overcrowding. Smell usually means moisture, so fix the moisture first.
What is the best way to clean a chicken coop?
Remove birds and equipment, scrape out all bedding, scrub with hot water and detergent, rinse, disinfect when needed, let everything dry fully, then add fresh bedding.
How often should you clean chicken nesting boxes?
Change nest box bedding every one to two weeks, and immediately if it is soiled or an egg breaks.
How often should you clean chicken waterers and feeders?
Rinse waterers daily and scrub them weekly. Brush out feeders weekly and check for mold or damp feed every day.
What do you put on the floor of a chicken coop?
Common choices are pine shavings, sand, hemp, or straw. Choose something absorbent, dry, and easy to clean. Avoid cedar shavings because of the strong aromatic oils.
How often should you disinfect a chicken coop?
Once or twice a year works for most flocks. Disinfect more often after illness, mite outbreaks, or before introducing new birds.