How to Clean a Chicken Coop: Getting the Technique Right

How to clean a chicken coop properly involves more than just shoveling out old bedding. The right tools, technique, and safety precautions make the job faster, more effective, and safer for you and your flock. If you’re wondering how often this needs to happen, that scheduling question is covered separately; this guide focuses specifically on doing the job itself well.
This chicken coop cleaning guide covers the tools worth having, surface-by-surface technique, safety considerations around ammonia and dust exposure, and what to actually do with everything you clean out.
Quick Answer: How to clean a chicken coop properly involves removing birds temporarily, clearing out all bedding, scrubbing surfaces with a poultry-safe disinfectant, allowing full drying time, and replacing with fresh bedding. Wearing a dust mask and gloves protects against ammonia fumes and bacterial exposure, both genuine health considerations during a thorough coop hygiene session.
Table of Contents
Tools and Supplies Worth Having
Essential Equipment
- A flat shovel or scraper for removing bedding and caked droppings
- A stiff scrub brush for surfaces
- A poultry-safe disinfectant
- Rubber gloves and a dust mask or respirator
- A wheelbarrow or bucket for waste transport
- Fresh bedding material ready for after cleaning
| Tool | Purpose |
| Flat shovel/scraper | Removes bedding and caked-on droppings efficiently |
| Scrub brush | Cleans roosting bars, nesting boxes, walls |
| Poultry-safe disinfectant | Kills bacteria without harming birds when properly rinsed and dried |
| Dust mask/respirator | Protects against ammonia and dust inhalation |
| Wheelbarrow | Efficient waste transport to compost or disposal area |
Did You Know? Dried chicken droppings and disturbed bedding release significant airborne dust and ammonia particles, which is exactly why respiratory protection matters even for a task that might seem straightforward.
Safety Precautions Before You Start
Protecting Yourself
Wear a dust mask or respirator rated for fine particles, along with gloves, since chicken droppings can carry bacteria like Salmonella that pose a real, if generally manageable, health risk to handlers.
Protecting Your Birds
Remove birds from the coop during a full clean, both for their comfort and to allow full access without navigating around an active flock.
Ventilation During Cleaning
Open all available doors, windows, and vents before starting, both to reduce your own exposure to ammonia and dust and to speed up drying time afterward.
| Precaution | Why It Matters |
| Dust mask/respirator | Reduces ammonia and dust inhalation |
| Gloves | Reduces bacterial exposure |
| Remove birds | Safety and easier access |
| Maximize ventilation | Reduces exposure, speeds drying |
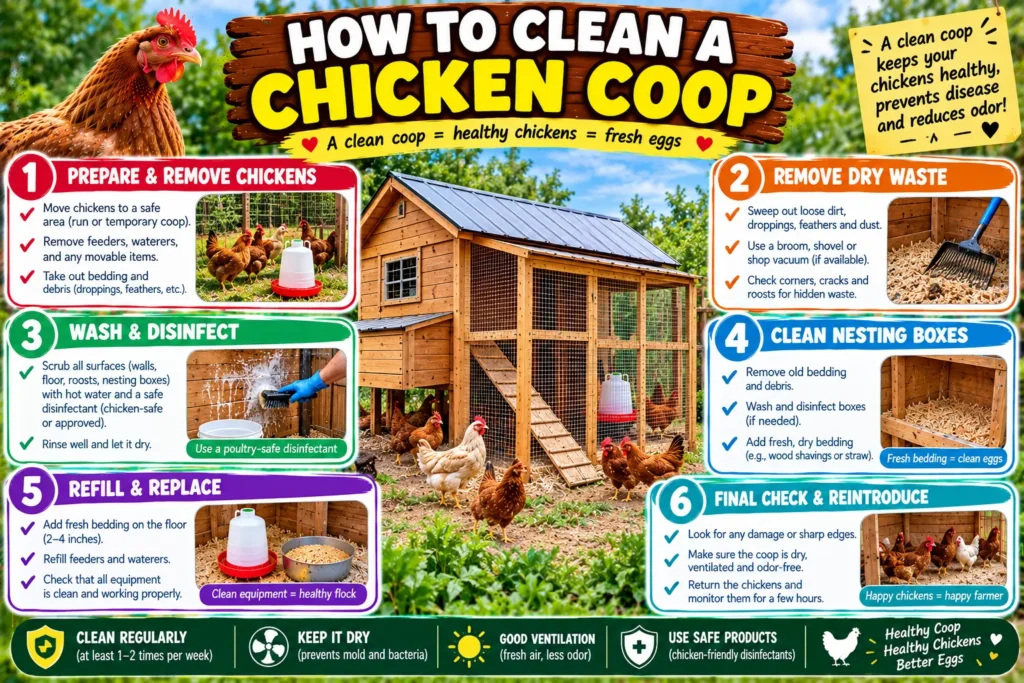
Step-by-Step: How to Clean a Chicken Coop Thoroughly
1. Remove Birds and Clear the Space
Move birds to a temporary space, ideally with access to food, water, and shelter, while you work.
2. Remove All Bedding
Use your shovel or scraper to clear bedding completely, paying particular attention to caked areas under roosting bars.
3. Scrub Surfaces by Material
- Wood surfaces: Scrub with a stiff brush and diluted disinfectant, avoiding excessive soaking that can promote rot over time.
- Metal surfaces: Generally more resistant to scrubbing and moisture; clean thoroughly and dry to prevent rust.
- Plastic components (nesting box liners, feeders): Can typically be removed and cleaned separately, sometimes even soaked, for a more thorough result.
| Surface | Cleaning Approach | Special Consideration |
| Wood | Scrub, avoid excess soaking | Rot risk with prolonged moisture |
| Metal | Scrub, dry thoroughly | Rust risk if left wet |
| Plastic | Can remove and soak separately | Generally most durable to cleaning |
4. Apply Disinfectant
Follow product-specific dilution instructions for a poultry-safe disinfectant, applying to all surfaces including nesting boxes and roosting bars.
5. Allow Complete Drying Time
This step is genuinely important: reintroducing bedding or birds to a still-damp coop encourages the very bacterial growth and ammonia buildup you just addressed.
6. Add Fresh Bedding
Once fully dry, add fresh bedding material at an appropriate depth for your chosen method, whether traditional bedding or starting a new deep litter cycle.
7. Reintroduce Birds
Return birds to the clean space, and take the opportunity to observe them closely as they resettle, since this is a good moment to notice any health concerns.
Read More: https://lashegg.com/how-often-to-clean-a-chicken-coop-2/
What to Do With Coop Waste
Composting
Chicken droppings and used bedding compost well, though fresh droppings are considered “hot” and generally need several months of composting before safe use on food gardens, since fresh manure can burn plants and carries pathogen risks.
Direct Disposal
If composting isn’t practical, most municipal green waste or yard waste programs accept coop cleanings, though checking local guidelines is worthwhile since some programs have restrictions on animal waste.
| Disposal Method | Timeline | Considerations |
| Composting for garden use | 3–6+ months | “Hot” manure needs aging before food-garden use |
| Direct disposal | Immediate | Check local yard waste program guidelines |
| Municipal pickup | Varies | Some programs restrict animal waste |
Expert Tip
Start a dedicated compost pile specifically for coop waste, separate from your regular kitchen compost, so you can track aging time accurately before using it anywhere near food crops.
Common Mistakes to Avoid
- Skipping personal protective equipment, exposing yourself unnecessarily to ammonia and bacteria
- Reintroducing bedding or birds before surfaces are completely dry
- Using non-poultry-safe cleaning products that leave harmful residue
- Applying fresh, unaged manure directly to food gardens
- Cleaning without adequate ventilation, increasing your own exposure to airborne particles
Warning
Chicken droppings can carry Salmonella and other bacteria capable of causing illness in humans. Always wash hands thoroughly after cleaning, avoid touching your face during the process, and consider dedicated cleaning clothes or shoes kept separate from everyday wear.
When to Call a Vet
Contact a poultry veterinarian if your flock shows respiratory symptoms following a coop cleaning session, which could indicate sensitivity to cleaning products used, or if birds seem unusually stressed after being displaced during the process. A vet can help rule out product sensitivity versus other causes.
People Also Ask
What’s the best disinfectant for how to clean a chicken coop safely? Poultry-specific disinfectants, or a properly diluted bleach solution followed by thorough rinsing and complete drying, are both commonly recommended options.
Do I need to wear protective gear for basic coop hygiene tasks? For a full deep clean, yes; a dust mask and gloves meaningfully reduce exposure to ammonia, dust, and bacteria, even though lighter daily tasks require less protection.
Can I use my regular household cleaning products in a chicken coop cleaning guide approach? It’s better to use products specifically labeled safe for poultry or livestock use, since many household cleaners leave residues that can be harmful if birds are reintroduced too soon.
How long should I wait before returning chickens after cleaning? Wait until all surfaces are completely dry and any disinfectant has fully cured according to the product’s instructions, typically several hours to overnight.
Is composting chicken coop waste safe for a vegetable garden? Yes, once properly aged for several months, composted chicken manure is a valuable garden amendment, though fresh, unaged manure should never be applied directly to food-growing areas.
Final Thoughts
How to clean a chicken coop well comes down to having the right tools, following a thorough process by surface type, protecting yourself with basic safety precautions, and handling the resulting waste responsibly. Getting the technique right makes the job faster and genuinely more effective at supporting flock health.
Build good coop hygiene habits around this process, and reach out to a poultry veterinarian if anything about your flock’s behavior or health seems different following a cleaning session.
5. FAQ
Q: What’s the fastest way to learn how to clean a chicken coop properly? A: Following a consistent step-by-step process, remove birds, clear bedding, scrub and disinfect, dry completely, then add fresh bedding, makes the task efficient and repeatable each time.
Q: Does a chicken coop cleaning guide need to include composting information? A: It’s worth including, since most keepers eventually need to decide what to do with cleaned-out waste, and composting is one of the most practical, useful options available.
Q: How important is coop hygiene really for flock health? A: Very; poor coop hygiene contributes to ammonia buildup, parasite proliferation, and bacterial growth, all of which can directly affect respiratory and overall flock health.
Q: Can I clean a chicken coop without removing the birds? A: For quick spot-cleaning, yes, but a full deep clean is safer and more thorough with birds temporarily relocated to a separate space.
Q: What should I do if I inhale dust or ammonia while cleaning? A: Step into fresh air immediately, and wear a proper dust mask or respirator for future cleanings to prevent repeated exposure.