Chicken Coop Ventilation: The Balance That Matters Most

Chicken coop ventilation sits at an uncomfortable intersection: too little airflow lets moisture and ammonia build up to harmful levels, while too much creates direct drafts that stress roosting birds, particularly in cold weather. Getting this balance right is one of the more technical parts of coop design, but also one of the most impactful for flock health.
This guide covers exactly how proper chicken coop ventilation works, where vents should go, how much airflow is actually needed, and how to adjust for summer heat versus winter cold without compromising either.
Quick Answer: Proper chicken coop ventilation means placing vents high on the walls, above roosting height, to allow moisture and ammonia to escape without creating drafts directly on birds. Cross-ventilation between opposite walls supports consistent airflow, and vent size should be adjustable to increase in summer and decrease, without fully sealing, in winter.
Table of Contents
Why Coop Airflow Matters So Much
The Moisture and Ammonia Problem
Chicken droppings and respiration both release moisture and ammonia into a coop’s air. Without adequate ventilation, ammonia concentrations can rise to levels that irritate a bird’s respiratory tract, increasing susceptibility to illness even when the coop looks clean.
The Draft Problem
At the same time, cold air moving directly across roosting birds, especially at night, can cause genuine cold stress and increase the risk of frostbite on combs and wattles. This is why simply maximizing airflow isn’t the right solution either.
| Ventilation Level | Result |
| Too little | Ammonia and moisture buildup, respiratory risk |
| Balanced, well-placed | Moisture/ammonia managed without drafts |
| Too much, poorly placed | Direct drafts, cold stress, frostbite risk |
Did You Know? Chickens can tolerate surprisingly cold temperatures well when dry and out of direct drafts, since their feathers provide effective insulation; it’s the combination of cold and moving air directly on the body that causes the most stress, not cold alone.
Where Vents Should Actually Go
Height Matters Most
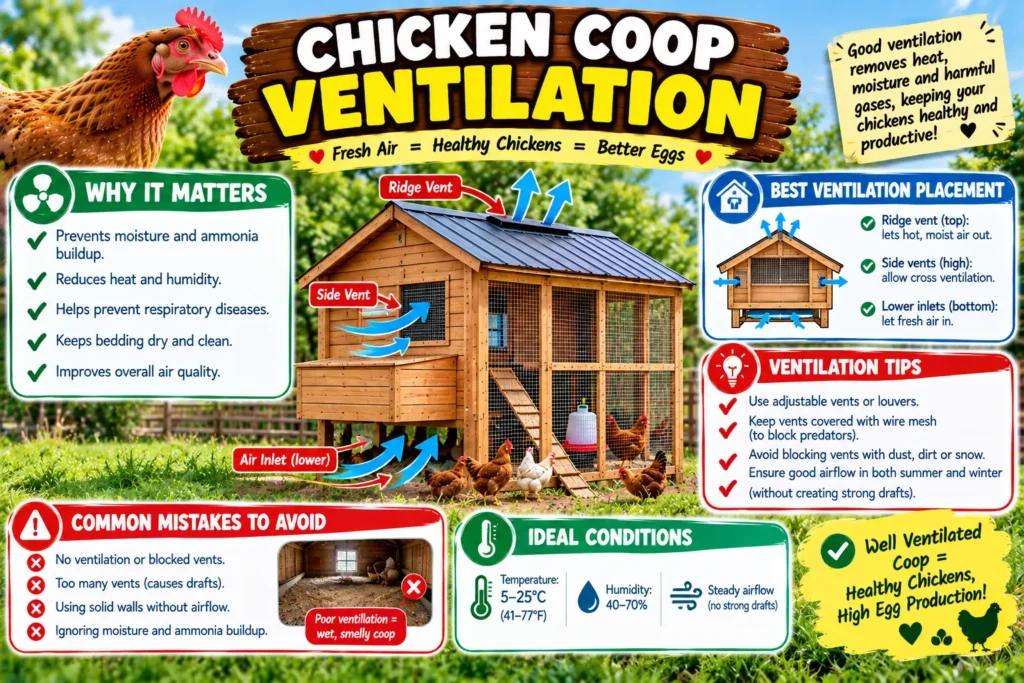
Proper chicken coop ventilation relies heavily on vent placement above roosting bar height. This allows warm, moist air, which naturally rises, to escape without creating airflow at bird level where they sleep.
Cross-Ventilation Design
Placing vents on opposite walls, rather than clustering them on a single side, creates more consistent airflow throughout the space rather than isolated pockets of stagnant air.
Ridge Vents and Roof Options
For larger coops, a ridge vent along the roofline provides excellent passive airflow for rising warm air, often combined with lower intake vents for a complete circulation system.
| Vent Placement | Purpose |
| High side walls, above roost | Primary moisture/ammonia escape without drafts |
| Opposite wall placement | Cross-ventilation, consistent airflow |
| Ridge vents (larger coops) | Passive escape for rising warm, moist air |
Seasonal Ventilation Adjustments
Summer: Maximize Airflow
In hot weather, open vents fully and consider adding additional temporary openings or fans to support cooling, since heat stress becomes a significant concern well before winter drafts would be.
Winter: Reduce, Don’t Eliminate
Winter ventilation should be reduced but never fully sealed. Completely closing off airflow to conserve heat backfires by trapping moisture and ammonia, ultimately posing a greater health risk than moderate cold.
Step-by-Step: Adjusting Seasonally
- Assess current airflow entering the coop. Note whether birds seem to be in a direct draft path during cold weather.
- Adjust vent covers or panels rather than fully closing them. Partial closure in winter maintains essential airflow while reducing volume.
- Increase openings gradually as temperatures rise. Match adjustments to actual seasonal changes rather than a fixed calendar date.
- Monitor for condensation on interior surfaces. Visible moisture buildup signals inadequate ventilation for current conditions.
| Season | Ventilation Approach |
| Summer | Maximize airflow, consider fans |
| Spring/Fall | Moderate, adjust as needed |
| Winter | Reduce volume, never fully seal |
Signs of Inadequate Chicken Coop Ventilation
What to Watch For
- A noticeable ammonia smell upon entering the coop
- Visible condensation or dampness on walls and ceiling, especially in winter
- Increased respiratory symptoms across the flock
- Consistently damp bedding despite regular cleaning
What to Watch For With Excessive Ventilation
- Birds huddling specifically near roosting bars in a way suggesting draft avoidance
- Frostbite on combs or wattles during cold weather
- Bedding near vents consistently wetter or colder than the rest of the coop
| Sign | Likely Issue |
| Ammonia smell | Inadequate ventilation |
| Condensation on walls | Inadequate ventilation, especially winter |
| Frostbite risk | Possible draft issue near roost |
| Localized cold spots | Vent placement creating draft |
Expert Tip
Do a “smell and feel” check when you first enter the coop each morning, before your senses adjust to the environment. A lingering ammonia smell or noticeably damp, heavy air on that very first breath is one of the more reliable ways to catch inadequate proper chicken coop ventilation before it becomes a bigger problem.
Read More: https://lashegg.com/how-to-clean-a-chicken-coop/
Common Mistakes to Avoid
- Sealing the coop completely in winter to conserve heat, trapping moisture and ammonia
- Placing vents at roosting height, creating direct drafts on sleeping birds
- Relying on a single vent location instead of cross-ventilation
- Ignoring condensation on interior surfaces as an early warning sign
- Assuming a coop that seems fine in summer will automatically work in winter without adjustment
Warning
Chronic exposure to poor coop airflow and resulting ammonia buildup is a well-documented contributor to respiratory illness in poultry. According to the Merck Veterinary Manual, environmental factors including ventilation play a significant role in respiratory disease susceptibility, making this an issue worth taking seriously rather than treating as a minor detail.
When to Call a Vet
Contact a poultry veterinarian if your flock shows respiratory symptoms, such as coughing, sneezing, or labored breathing, that might relate to coop air quality, especially after noticing ammonia smell or condensation issues. A vet can help determine whether environmental ventilation problems have contributed to a developing respiratory issue.
People Also Ask
How much chicken coop ventilation is actually needed? There’s no single universal number, but vents should be positioned to allow constant, gentle airflow above roosting height without creating a direct draft on birds, adjusted seasonally for volume.
Can too much coop airflow harm chickens in winter? Yes, if positioned to create direct drafts on roosting birds, excessive airflow in cold weather can contribute to cold stress and frostbite risk, even though some ventilation must always remain.
How do I know if my proper chicken coop ventilation setup is actually working? Absence of ammonia smell, no condensation on interior surfaces, and a flock without respiratory symptoms are all signs your ventilation is functioning well.
Should coop airflow be different for larger flocks? Yes, more birds produce more moisture and ammonia, generally requiring proportionally more ventilation capacity than a smaller flock in the same size space.
Does chicken coop ventilation affect egg production? Indirectly, yes; poor air quality contributes to stress and potential respiratory illness, both of which can reduce egg production, making ventilation one of several environmental factors supporting consistent laying.
Final Thoughts
Chicken coop ventilation requires balancing two competing needs: enough airflow to prevent ammonia and moisture buildup, without creating direct drafts on roosting birds. Proper vent placement above roost height, combined with cross-ventilation and seasonal adjustment, achieves this balance for most coop designs.
Watch for the specific warning signs of both too little and too much airflow, and reach out to a poultry veterinarian if respiratory symptoms suggest coop airflow might be contributing to a developing health issue.
5. FAQ
Q: Where should chicken coop ventilation vents be placed for the best results? A: High on the walls, above roosting bar height, with vents on opposite sides for cross-ventilation, generally provides the most effective and draft-free airflow.
Q: How does proper chicken coop ventilation change between summer and winter? A: Summer calls for maximized airflow to support cooling, while winter requires reduced but never fully sealed ventilation to prevent moisture and ammonia buildup.
Q: Can I add coop airflow without expensive construction changes? A: Yes, adjustable vent covers, strategically placed windows, or even temporary openings during specific weather conditions can improve airflow without major renovation.
Q: Is a ridge vent necessary for good chicken coop ventilation? A: Not necessary for smaller coops, but it’s a highly effective passive option for larger structures, working well alongside lower intake vents for complete circulation.
Q: How can I tell if my coop’s ventilation is causing a draft problem? A: Watch for birds specifically avoiding certain roosting spots, or check for frostbite on combs and wattles in winter, both of which suggest a draft issue near the roost.