Chicken Parasite Prevention: Your Flock’s First Line of Defense

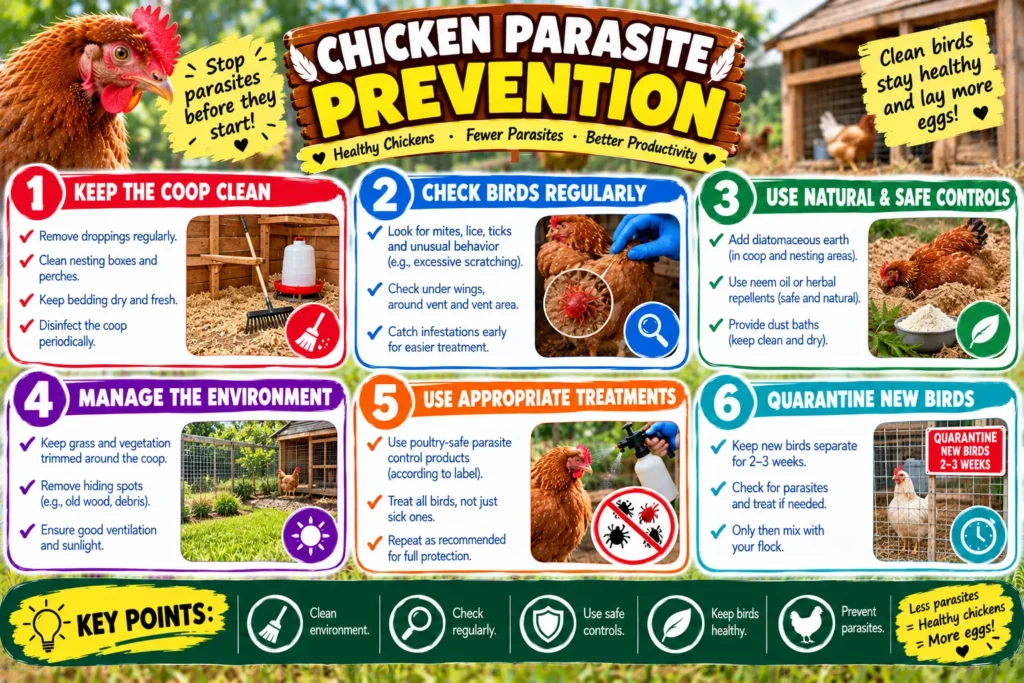
Quick Answer: Chicken parasite prevention comes down to four habits: clean bedding on a regular schedule, dust baths with diatomaceous earth or wood ash, routine fecal checks, and quarantine for new birds. Do these consistently and most mite, lice, and worm problems never get the chance to start.
Parasites are one of the most common — and most preventable — health problems in backyard and small-scale flocks. A single untreated mite infestation can drop egg production within days. Left alone, internal worms can quietly rob your birds of nutrients for months before you notice anything wrong. The good news is that chicken parasite prevention is mostly about routine, not medication. Once you build the right habits into your coop management, parasites become rare visitors instead of constant problems.
This guide covers everything from spotting the first signs of trouble to building a season-by-season prevention schedule that actually holds up in real backyard conditions.
Table of Contents
Why Chicken Parasite Prevention Matters More Than Treatment
Treating an active infestation is harder, slower, and more stressful for your birds than stopping one before it starts. External parasites like mites and lice reproduce in days, not weeks, so by the time you notice feather loss or scabby legs, the population in your coop may already be large. Internal parasites are worse in one specific way: eggs shed in droppings can survive in soil for months, reinfecting the same birds over and over if the environment isn’t managed.
Did You Know? A single female poultry mite can lay several dozen eggs in her short lifespan, and the entire life cycle from egg to breeding adult can take as little as seven days in warm weather.
Prevention also protects the things treatment can’t fix retroactively — lost body condition, dropped egg output, and stress on young or weak birds that may not fully recover even after the parasite is gone.
Read More: https://lashegg.com/how-to-prevent-diseases-in-chickens/
Common Chicken Parasites You Need to Know About
Poultry parasite control starts with knowing what you’re actually dealing with. Chickens can host both external parasites (living on the skin and feathers) and internal parasites (living in the digestive tract and other organs).
External Parasites
- Northern fowl mites – tiny, fast-moving, often found around the vent
- Red mites (roost mites) – live in coop cracks by day, feed on birds at night
- Lice – chewing insects that live entirely on the bird, feeding on feathers and skin debris
- Scaly leg mites – burrow under leg scales, causing raised, crusty legs
- Fleas and sticktight fleas – attach around the face, comb, and wattles
Internal Parasites
- Roundworms (Ascaridia galli) – the most common internal parasite in backyard flocks
- Cecal worms (Heterakis gallinarum) – often carry blackhead disease between birds
- Capillary worms (hairworms) – cause weight loss and reduced appetite
- Gapeworms – lodge in the windpipe, causing gasping and head-shaking
- Tapeworms – picked up from intermediate hosts like beetles, slugs, and earthworms
- Coccidia – technically a protozoan, not a worm, but grouped here since prevention overlaps heavily
Symptom Comparison Table
| Parasite Type | Common Symptoms | Where to Look | Typical Onset |
| Northern fowl mites | Feather loss, scabbing, dark specks near vent | Vent area, under wings | Days to 1–2 weeks |
| Red mites | Pale comb, restlessness at night, anemia | Roosts, coop crevices at night | 1–3 weeks |
| Lice | Ragged feathers, visible egg clusters at feather base | Base of feathers, vent, under wings | 2–4 weeks |
| Scaly leg mites | Raised, crusty, thickened leg scales | Legs and feet | Weeks to months |
| Roundworms | Weight loss, pale comb, diarrhea, poor growth | Fecal exam, droppings | Weeks |
| Gapeworms | Gasping, head shaking, stretched neck | Windpipe (vet diagnosis) | 1–2 weeks |
| Coccidia | Bloody droppings, lethargy, huddling | Droppings, especially in chicks | Days |
Building a Chicken Parasite Prevention Routine
Preventing mites and worms is not a single task — it’s a set of habits that reinforce each other. Skipping any one of them creates an opening.
1. Coop Hygiene and Bedding Management
Damp, dirty bedding is the single biggest risk factor for parasite buildup. Mite eggs, worm eggs, and coccidia oocysts all survive longer in moist, organic material.
- Remove wet or caked bedding at least weekly
- Do a full deep clean of the coop every 4–6 weeks, more often in warm, humid climates
- Scrub roosts and nest boxes, since red mites hide in wood cracks during the day
- Let the coop dry completely and get direct sunlight before adding fresh bedding
- Use a coop cleaning schedule you can actually stick to — our guide to how often to clean a chicken coop breaks this down by flock size and climate
Expert Tip: Sunlight and dry heat are two of the cheapest, most effective mite killers you have. Whenever weather allows, open the coop up during the day to air it out and let UV light hit every surface.
2. Dust Baths and Natural Parasite Deterrents
Chickens dust bathe instinctively to manage their own parasite load, and giving them the right material makes a real difference.
- Provide a dedicated dust bath area with dry dirt, sand, or wood ash
- Diatomaceous earth (food-grade, applied dry) can be mixed into dust bath areas
- Herbs like dried lavender, mint, and marigold in nest boxes are mildly deterrent, though they should never replace proper hygiene
3. Routine Health Checks
Catching a problem early is far easier than clearing an established infestation.
- Handle each bird monthly and check under the wings, around the vent, and at the base of tail feathers
- Look for dark specks (mite droppings) or crawling insects at the base of feathers
- Check legs for raised or crusty scales
- Watch droppings weekly for changes in consistency, color, or blood
- Weigh birds periodically if you suspect internal parasites — unexplained weight loss is a key warning sign
4. Quarantine and Biosecurity
Most serious parasite outbreaks in established flocks trace back to a single introduction point: a new bird, a borrowed piece of equipment, or contact with wild birds.
- Quarantine all new birds for a minimum of 30 days before introducing them to the main flock
- Treat or clear new birds for parasites during quarantine, not after
- Avoid sharing equipment, feeders, or crates between flocks without disinfecting first
- Limit wild bird access to feed and water, since wild birds can carry mites and worm eggs
Warning: Skipping quarantine is the most common mistake backyard keepers make. Even a healthy-looking bird can be shedding worm eggs or carrying mites that haven’t caused visible symptoms yet.
5. Deworming Schedules
A fecal float test through your vet or an ag extension lab is the only reliable way to know whether your flock needs deworming and for what. Blanket deworming without testing can lead to unnecessary medication use and doesn’t tell you which parasite you’re dealing with.
| Approach | What It Involves | Best For |
| Reactive deworming | Treat only after symptoms or a positive fecal test | Small flocks with regular health checks |
| Scheduled testing | Fecal float every 3–6 months regardless of symptoms | Flocks on the same ground year-round |
| Preventive rotation | Rotate ground use, avoid year-round deworming | Free-range or pasture-based setups |
Environmental and Seasonal Parasite Control
Poultry parasite control changes with the seasons, since temperature and humidity directly affect parasite life cycles.
- Spring: Peak hatching season for many worm eggs; deep clean the coop as temperatures rise
- Summer: Mite populations explode in heat and humidity; check birds more frequently
- Fall: Good time for a fecal check before winter confinement begins
- Winter: Birds spend more time indoors, so red mites hiding in coop cracks become more of a risk despite the cold
Common Mistakes in Chicken Parasite Prevention
Common Mistakes
- Treating symptoms without identifying the actual parasite
- Cleaning bedding but never scrubbing roosts and nest box frames, where red mites hide
- Assuming free-range birds don’t need parasite checks
- Introducing new birds without quarantine
- Using human or livestock dewormers not labeled or dosed for poultry
Natural vs. Medicated Approaches
Both natural prevention and medicated treatment have a place, and understanding the difference matters for flock health.
| Approach | Examples | Effectiveness | Notes |
| Natural prevention | Dust baths, diatomaceous earth, clean bedding, sunlight | High for prevention, low for active infestations | Best used continuously, not as treatment |
| Herbal deterrents | Lavender, mint, garlic in feed | Mild deterrent effect only | Not a substitute for hygiene or medication |
| Medicated treatment | Permethrin sprays, ivermectin-based products, labeled poultry dewormers | High for active infestations | Requires correct dosing and egg withdrawal awareness |
When to Call a Vet: If you see blood in droppings, gasping or stretched-neck breathing, sudden weight loss, or if a fecal test shows a heavy parasite load, contact a poultry veterinarian. Some treatments require prescription-strength medication and precise dosing based on bird weight.
Egg Safety and Withdrawal Periods
Any medicated parasite treatment used on laying hens may come with an egg withdrawal period — a set number of days you should discard eggs before eating them again. Always read the product label, since withdrawal periods vary by active ingredient and are set by the manufacturer and regulatory guidance rather than being a fixed universal number.
Frequently Asked Questions
How often should I check my chickens for parasites? A monthly hands-on check is a reasonable baseline for most backyard flocks, with more frequent checks during hot, humid weather when mite populations grow fastest.
Can chicken parasite prevention be done without chemicals? Yes, for the most part. Clean bedding, dust baths, sunlight exposure, and quarantine practices prevent the majority of infestations. Chemical treatment becomes necessary mainly once an infestation is already established.
Do free-range chickens need parasite prevention too? Yes. Free-range birds are actually more exposed to worm eggs in soil and contact with wild birds, so preventing mites and worms matters just as much, if not more, than for confined flocks.
How do I know if it’s mites or lice? Mites are usually harder to see with the naked eye and tend to concentrate around the vent, while lice are slightly larger, move along feather shafts, and leave visible egg clusters (nits) at the feather base.
Is diatomaceous earth enough for poultry parasite control on its own? No. It’s a useful supporting tool in dust baths and coop bedding, but it isn’t a substitute for regular cleaning, quarantine, and monitoring.
How long does it take to clear a mite infestation? With consistent treatment and cleaning, most infestations clear within 2–3 weeks, since treatment needs to be repeated to catch newly hatched mites the first application missed.
Final Thoughts
Chicken parasite prevention isn’t complicated, but it does require consistency. A clean, dry coop, a dedicated dust bath area, regular hands-on checks, and a strict quarantine policy for new birds will prevent the vast majority of mite, lice, and worm problems before they start. When symptoms do appear — blood in droppings, labored breathing, sudden weight loss — get a fecal test or veterinary opinion rather than guessing at treatment. Keep watching your flock closely, and parasite problems stay rare instead of routine.