Bumblefoot Treatment: A Full Protocol From Soaking to Healed Foot

Successful bumblefoot treatment depends on one key fact: once a firm, pus-filled core has formed under that black scab, soaking and ointment alone won’t clear it. The core has to come out, whether through careful home removal or a vet’s minor surgical procedure, and the wound then needs consistent bandaging and monitoring until it fully closes.
This guide walks through the entire treatment process step by step, from the first soak through the exact bandaging technique experienced keepers use, a realistic day-by-day healing timeline, and the newer options vets are exploring for chronic cases. You’ll also find a supply checklist, a decision table for judging severity, and answers to the questions people ask most when they’re facing this for the first time.
Table of Contents
Quick Answer: Bumblefoot treatment starts with soaking the foot in warm Epsom salt water to soften the scab, followed by careful removal of the embedded core using sanitized tools, flushing the wound, and bandaging it with a self-adhesive wrap woven between the toes. The bandage is typically checked or changed every 24 to 48 hours at first, then every few days as healing progresses, with most straightforward cases fully healed within one to three weeks. Deep, recurring, or badly infected cases need veterinary treatment rather than home removal.
Before You Start: Judge the Severity
Not every case needs the same level of intervention. Use this table to get a realistic sense of what you’re dealing with before choosing your approach.
| What You See | Likely Severity | Recommended Approach |
| Mild redness, no scab yet | Very early | Address the cause, monitor, consider preventive soaking |
| Small black scab, mild swelling, no firm lump felt | Early | Soaking and topical ointment may be sufficient |
| Larger scab with a firm, movable lump underneath | Moderate | Core removal typically needed |
| Significant swelling, redness spreading up the foot, limping | Advanced | Veterinary evaluation recommended |
| Red streaks up the leg, lethargy, foul odor, refusal to bear weight | Severe | Veterinary care needed promptly |
Warning: Signs like red streaking up the leg, a foul smell, or a hen refusing to put any weight on the foot point to a more serious infection than typical home bumblefoot treatment is meant to handle. These signs mean it’s time for a vet, not another round of home care.
Read More: https://lashegg.com/bumblefoot-in-chickens/
Supplies for Bumblefoot Treatment
Gathering everything ahead of time makes the process faster and reduces stress for both you and your hen.
- Warm water and Epsom salt for soaking
- Betadine or a similar iodine-based antiseptic solution
- Chlorhexidine solution or spray (optional, for flushing)
- A sanitized scalpel or small, sharp blade
- Sanitized tweezers or hemostats
- Disposable gloves
- Clean towels
- Non-stick gauze pads
- Antibiotic ointment, or a veterinary wound spray
- Self-adhesive bandage wrap (commonly called Vetwrap or Vetrap), cut into narrow strips
- Optional: medical tape or electrical tape for extra bandage security
Warning: Sanitize every tool and surface thoroughly before and after the procedure, including a bleach-and-water rinse for cutting tools. Poor hygiene during core removal is one of the most common ways a bumblefoot case gets worse instead of better.
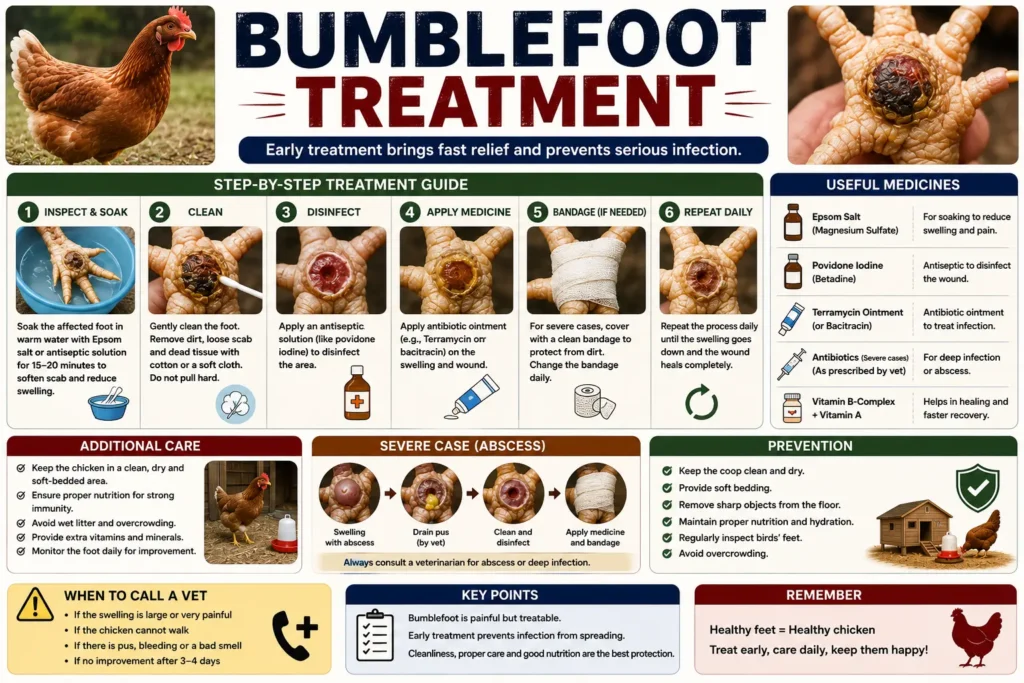
Step 1: Soften the Scab
- Fill a basin with warm water and Epsom salt, enough to comfortably cover the affected foot.
- Soak the foot for 10 to 15 minutes. This softens the scab and surrounding tissue, making the next steps far easier and less stressful for your hen.
- Pat the area dry with a clean towel once the soak is complete.
Step 2: Remove the Core
This step is the heart of effective bumblefoot treatment for any case beyond the mildest stage, since the infected core won’t resolve through soaking alone.
- Sanitize your hands, gloves, and all tools immediately before beginning.
- Gently lift the edge of the softened scab using sanitized tweezers, working slowly to avoid unnecessary tearing.
- Carefully separate the firm, cheese-like core from the surrounding tissue, using light pressure rather than force. It may come out in one piece or in smaller sections.
- Expect some bleeding, which is normal, and apply gentle pressure with a clean gauze pad if needed.
- Flush the open wound thoroughly with an iodine-based antiseptic, followed by a chlorhexidine rinse if you have it, to clean out any remaining debris.
Expert Tip: Work in good lighting and don’t rush. If the core isn’t coming free easily after a reasonable, gentle attempt, stop and consult a vet rather than digging deeper into the tissue, which raises the risk of injury and further infection.
Step 3: Bandage the Foot Correctly
Proper bandaging protects the wound, keeps it clean, and supports healing between treatments. Self-adhesive wrap is the standard choice because it sticks to itself rather than to feathers or skin.
- Apply antibiotic ointment or a veterinary wound spray directly to the cleaned wound.
- Place a piece of non-stick gauze over the wound.
- Cut your self-adhesive wrap into narrow strips, roughly one inch wide, for easier handling around small toes.
- Start wrapping at the shank, just above the foot, and bring the wrap down and between two toes.
- Weave the wrap over the top of the foot and back through the toes, continuing in a figure-eight style pattern to keep the gauze secured without crushing the toes together.
- Finish by wrapping back up and around the shank, ending an inch or so above the foot, and press the material to itself to secure it.
- Avoid wrapping too tightly. The bandage should stay snug but never cut off circulation.
Warning: A bandage wrapped too tightly can restrict blood flow to the foot, which risks tissue damage far worse than the original infection. If the toes look discolored or cold after wrapping, remove and reapply more loosely.
Bandage Change Schedule
| Timing | What to Do |
| First 24–48 hours | Leave the bandage in place, then remove to assess the wound |
| Days 2–6 | Re-clean, reapply ointment, and re-bandage every 1–2 days depending on how the wound looks |
| Around day 6–7 | Many straightforward cases are ready to have the bandage removed for good if the wound has closed and a healthy scab has formed |
| Ongoing | Continue monitoring even after bandaging stops, watching for any return of swelling or discharge |
If the gauze sticks to the wound when you remove a bandage, soak the foot briefly in warm water first rather than pulling it off, which can reopen healing tissue.
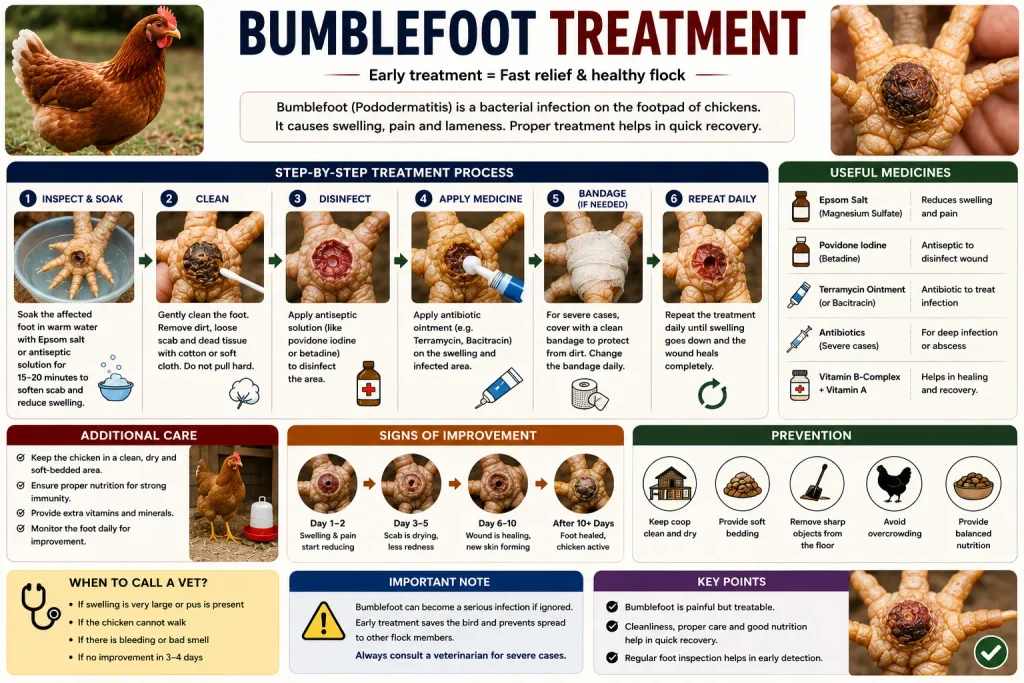
What Healing Should Look Like
A wound that’s healing well typically shows a clean, healthy-looking new scab forming within the first few days, with only mild oozing when the bandage is changed. Watch for these signs at each bandage change:
- Redness and swelling should be gradually decreasing, not increasing
- Discharge should be minimal and not foul-smelling
- The hen should be walking on the foot with improving comfort over time
- No red streaking should be visible traveling up the leg
Did You Know? Some keepers report their hens walking on and using the treated foot again within a day or two of a successful core removal and bandaging, since a properly cleaned wound often causes less discomfort than the infected core did.
When Bumblefoot Treatment Needs a Vet Instead
Home bumblefoot treatment isn’t right for every case. A veterinarian is the safer choice when:
- The core is deep, large, or doesn’t separate easily from surrounding tissue
- Swelling extends well beyond the immediate footpad or up the leg
- Red streaking, foul odor, or significant heat is present
- The hen shows lethargy, appetite loss, or reluctance to bear any weight
- The same foot has developed bumblefoot more than once despite good home care
- You’re not confident performing the procedure safely and cleanly
Veterinary treatment may include surgical debridement under anesthesia, radiographic imaging to check for bone or joint involvement, and antibiotics chosen based on culture and sensitivity testing rather than guesswork.
Emerging Bumblefoot Treatment Options
Traditional bandaging works well for many cases, but it isn’t always practical for chickens that live outdoors, since bandages can get wet and dirty quickly. Veterinary researchers have studied custom-fit silicone shoes as an alternative, designed using 3D-printed molds shaped from imaging of the bird’s foot. In a documented case series, chickens typically wore these shoes for about two weeks, and owners reported the shoes offered better ventilation, held up better outdoors, and didn’t require the daily changes that traditional bandaging often does. This kind of option is generally something to discuss with an avian vet for chronic or hard-to-bandage cases rather than a first-line home approach egg.
Common Mistakes During Bumblefoot Treatment
- Trying to treat a firm core with soaking alone. Once a hard core is present, ointment and soaking without removal generally won’t resolve the infection.
- Skipping tool sanitation. Introducing new bacteria during core removal can make the infection worse rather than better.
- Wrapping the bandage too tightly. This risks cutting off circulation to the foot.
- Not addressing the underlying cause. Rough perches, overgrown nails, or excess weight need attention alongside wound care, or the same foot, or the other one, can develop bumblefoot again.
- Stopping care too early. A wound that looks better after a couple of days still needs continued bandaging and monitoring until it’s genuinely closed.
- Attempting a deep or complicated removal without experience. More advanced or recurring cases are safer left to a vet.
Preventing a Repeat Case
Once your hen has recovered, a few habits reduce the chance of bumblefoot returning:
- Provide properly sized, varied perches to reduce pressure points
- Maintain a healthy body weight
- Trim overgrown toenails regularly
- Keep bedding clean and dry
- Remove sharp debris from runs and coop floors
- Check her feet periodically during routine flock health checks
Final Thoughts
Bumblefoot treatment comes down to a clear sequence: soften the scab, remove the core cleanly, flush the wound, and bandage it properly while it heals. Most straightforward cases, treated consistently, show real improvement within days and full healing within one to three weeks. More advanced or recurring cases, or any situation you’re not confident handling yourself, are better left to a veterinarian who can offer surgical removal, imaging, and properly prescribed antibiotics. Keep checking your flock’s feet regularly going forward, since catching bumblefoot early is always easier than treating an advanced case.
5. FAQ
Q: What is the first step in bumblefoot treatment? A: The first step is soaking the affected foot in warm Epsom salt water for 10 to 15 minutes to soften the scab and surrounding tissue before attempting to clean or remove the infected core.
Q: Can bumblefoot be treated without removing the core? A: Very mild cases without a firm core sometimes respond to soaking and topical antibiotic ointment alone, but once a hard, embedded core has formed, it generally needs to be physically removed for the infection to resolve.
Q: What kind of bandage should I use for bumblefoot treatment? A: A self-adhesive wrap, often called Vetwrap or Vetrap, is the standard choice, since it sticks to itself rather than feathers or skin and can be woven between the toes to stay secure.
Q: How often should I change the bandage during bumblefoot treatment? A: Many keepers leave the first bandage in place for 24 to 48 hours, then change it every one to two days as the wound heals, often removing bandaging entirely by around day six or seven if healing looks good.
Q: How long does bumblefoot treatment take to fully heal a chicken’s foot? A: Straightforward cases treated consistently often heal within one to three weeks, while more advanced or veterinary-treated cases can take longer depending on how deep the infection was.
Q: Is it safe to remove a bumblefoot core myself at home? A: Many experienced keepers do perform home core removal successfully with proper sanitation and technique, but deep, large, or recurring cores are safer handled by a veterinarian to avoid incomplete removal or further infection.
Q: What if the bumblefoot bandage is wrapped too tightly? A: A bandage that’s too tight can cut off circulation to the foot. If the toes look discolored, cold, or swollen after wrapping, remove the bandage and reapply it more loosely.
Q: Are there alternatives to traditional bandaging for bumblefoot treatment? A: Yes. Veterinary researchers have studied custom-fit silicone shoes as an alternative for chronic or hard-to-bandage cases, offering better ventilation and durability outdoors compared to traditional wraps, though this is typically arranged through an avian vet.